Showing posts with label dovetail. Show all posts
Showing posts with label dovetail. Show all posts
Saturday, February 22, 2014
Dovetail Layout Part 3 The Frank Klausz Technique
Ive finished setting up the dovetail layout discussion by talking about the tools, basic set up, and design ideas. Now were starting on the meat n taters of how I go about laying out varying dovetail joints. If you are just joining in and want to catch up, you can find all the posts collected HERE.
As Ive mentioned before, at one point I gave up learning to cut dovetails. I swore them off like Id just graduated from a joinery rehab program. As I understand it the real challenge isnt rehab itself, but staying away from lifes temptations after rehab. I guess when it comes to being a card carrying member of JA (joiners anonymous) My temptation, provided by Master Frank Klausz, proved to be too strong for my resolve. The article he published on dovetail layout and cutting in the October 2005 issue of Popular Woodworking saved me from a life devoid of my favorite and most satisfying woodworking technique.
Thank you Mr. Klausz.
Here is the basics of the technique I pulled from that article. It produces wonderfully even, strong dovetails. Frank is known for his stocky, broad pins and tails, and I really it tends to lean that way Im making my own design decisions
 You start the process by measuring in from each side of your stock, half of the thickness of the stock itself. This is standard 1X pine, therefore 3/4" thick, so the dividers are set to 3/8".
 I make the measurement on both sides. Youll see that I make a regular mistake and inevitably end up marking my measurements in the center of the board. When I do this, I then have to transfer the marks to the stocks outer face. This does illustrate that its important to keep track of the visible face of your stock. Try to habitually work with the "outside" of the stock facing you, because when youre sawing that leaves any tear out to the inside.
 Then using a bevel gauge set to your chosen dovetail angle, (or, if you prefer, an actual dovetail marker) I make my first marks, making sure the wide dimension of the tails face the outside. By now you are on your way.
 Then adjust another set of dividers to the full width of the board.
 Then set the narrow width of the first pin.
 And use the bevel gauge to mark the opposing line.
 Now get out your ruler and divide the remaining expanse in half. Be as accurate as possible because these pins and tails are supposed to match in size Mis-measurement can result in a loss of symmetry and an unfavorable result. Especially over a wider expanse of stock where small incremental inaccuracies can add up to something quite noticeable by the time youre done.
When the stock is wider than what Im working here, you repeat this step, measuring to the center as many times as it takes to get the divisions correct. Theres no magic number for correct, pay attention and your eyes will guide you.
 Make another mark with the gauge at this measurement. Make sure it is angled in the same orientation as the two lines measured from.
 Now take the dividers set to the FULL THICKNESS of the stock and measure the narrow width of the pin, just like you did on the first.
 Then mark the complementary angles.
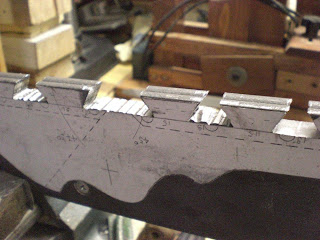
 With the layout complete take a minute to inspect your work. Mark your waste and try to imagine how it will turn out. Ask yourself, "Is this acceptable?" If the answer is Yes, move forward to the sawing.
It is very, very important to make sure you mark the waste on your "to be" dovetails. I know ego can sometimes sneak in after deciding youre proficient. Do not fall for that trap, it only ends in tears and frustration. The few seconds of time you take to mark your waste can make a world of difference later, especially if you have to re-prep a section of stock from scratch because of this little failing of arrogance.
I do speak from experience and tears when I say things like this.
 Always use the pins that have been cut out to mark the tails on the joining piece. There are two reasons for this. For one, you make up for small moments of humanity by creating a mirror image that will match up into a tight joint. Also, doing this is so much quicker than trying to re-layout the joint in opposite. When I first tried dovetails, I read so many confusing things that I laid out BOTH the pins and tails on the two pieces of stock before I tried to cut them. The results were somewhat less than ideal, as you probably can imagine.
 A little clean up with a plane and the joint looks smooth, tight, and wonderful.
The design of Franks layout looks very strong and even, It is a great take on the joint that does not have to take center stage, in fact in a figured wood or fine design, this layout will easily slip into the back ground and not overpower. Strong, regular, and traditional, this is a good place to start our exploration. Stay tuned for more layouts soon.
Cheers.
Oldwolf
Read More..
As Ive mentioned before, at one point I gave up learning to cut dovetails. I swore them off like Id just graduated from a joinery rehab program. As I understand it the real challenge isnt rehab itself, but staying away from lifes temptations after rehab. I guess when it comes to being a card carrying member of JA (joiners anonymous) My temptation, provided by Master Frank Klausz, proved to be too strong for my resolve. The article he published on dovetail layout and cutting in the October 2005 issue of Popular Woodworking saved me from a life devoid of my favorite and most satisfying woodworking technique.
Thank you Mr. Klausz.
Here is the basics of the technique I pulled from that article. It produces wonderfully even, strong dovetails. Frank is known for his stocky, broad pins and tails, and I really it tends to lean that way Im making my own design decisions
When the stock is wider than what Im working here, you repeat this step, measuring to the center as many times as it takes to get the divisions correct. Theres no magic number for correct, pay attention and your eyes will guide you.
It is very, very important to make sure you mark the waste on your "to be" dovetails. I know ego can sometimes sneak in after deciding youre proficient. Do not fall for that trap, it only ends in tears and frustration. The few seconds of time you take to mark your waste can make a world of difference later, especially if you have to re-prep a section of stock from scratch because of this little failing of arrogance.
I do speak from experience and tears when I say things like this.
The design of Franks layout looks very strong and even, It is a great take on the joint that does not have to take center stage, in fact in a figured wood or fine design, this layout will easily slip into the back ground and not overpower. Strong, regular, and traditional, this is a good place to start our exploration. Stay tuned for more layouts soon.
Cheers.
Oldwolf
Wednesday, February 5, 2014
N°1 Spiers Dovetail Plane
This post has written by Vittorio
Thinking of metal planes I often think to Stewart Spiers


I used Fe 430 steel bars (5x70mm) for sole and sides, joined the two sides in three points by countersunk screws (in this way the screws do not interfere while the pieces are clamped in the vice) and cut the tails.

The mouth is opened by boring it with a 3 mm tip, hack saw blade and a 2,5 mm file. I obtained two angles, one of 47° (seat angle) and the other of 45° (wear angle).


The blade support (47°) is fixed by 3 iron rivets (dia. 6,5 mm)


The sole is prepared for jointing and the classical Spiers profile is cut. Beautiful but a little bit laborious.


Sanding by 80 grit abrasive paper (sides are screwed to a piece of wood)


During the tail peening, if joints are precise, 2 mm of extra length are enough, otherwise 3 mm are necessary for closing all gaps.


The chipbreaker showed some rusted areas, so I sanded it (80 and 120 grit) and created the profile for a good adherence to blade at cutting edge.


The cap iron screw (M8, 16 mm head) was built by welding together a rectangular nut with a screwed rod.


Bun and handle are ash wood, stained and treated with shellac.
The M6 threaded spacers are inserted.


I decided to fix all by screwing and rebating; unfortunately some trace remains after the sanding job too.


The sole is flat, the mouth is tight


length 345 mm
Width 65 mm
Weight 3,366 Kg
Vittorio
Read More..
Thinking of metal planes I often think to Stewart Spiers
I like much the side profile and handles, so I searched for a model; I found it on the Handplane Central website, so I adapted the draw for a 2 inches blade and tried to building the plane.
I used Fe 430 steel bars (5x70mm) for sole and sides, joined the two sides in three points by countersunk screws (in this way the screws do not interfere while the pieces are clamped in the vice) and cut the tails.
The mouth is opened by boring it with a 3 mm tip, hack saw blade and a 2,5 mm file. I obtained two angles, one of 47° (seat angle) and the other of 45° (wear angle).
The blade support (47°) is fixed by 3 iron rivets (dia. 6,5 mm)
The sole is prepared for jointing and the classical Spiers profile is cut. Beautiful but a little bit laborious.
Sanding by 80 grit abrasive paper (sides are screwed to a piece of wood)
During the tail peening, if joints are precise, 2 mm of extra length are enough, otherwise 3 mm are necessary for closing all gaps.
Lever cap: I could not imitate the original because had not a model; however the job was acceptable for me.
The chipbreaker showed some rusted areas, so I sanded it (80 and 120 grit) and created the profile for a good adherence to blade at cutting edge.
The Sorby blade is 2" wide parallel iron (from e-bay); 25° bevel, 30° microbevel.
The cap iron screw (M8, 16 mm head) was built by welding together a rectangular nut with a screwed rod.
Bun and handle are ash wood, stained and treated with shellac.
The M6 threaded spacers are inserted.
I decided to fix all by screwing and rebating; unfortunately some trace remains after the sanding job too.
The sole is flat, the mouth is tight
I tried the plane on fir and beech, along the grain as well as across the grain. The results are very good and the plane does not get clogged.
Finally, I have got a Spiers
length 345 mm
Width 65 mm
Weight 3,366 Kg
Vittorio
Subscribe to:
Posts (Atom)